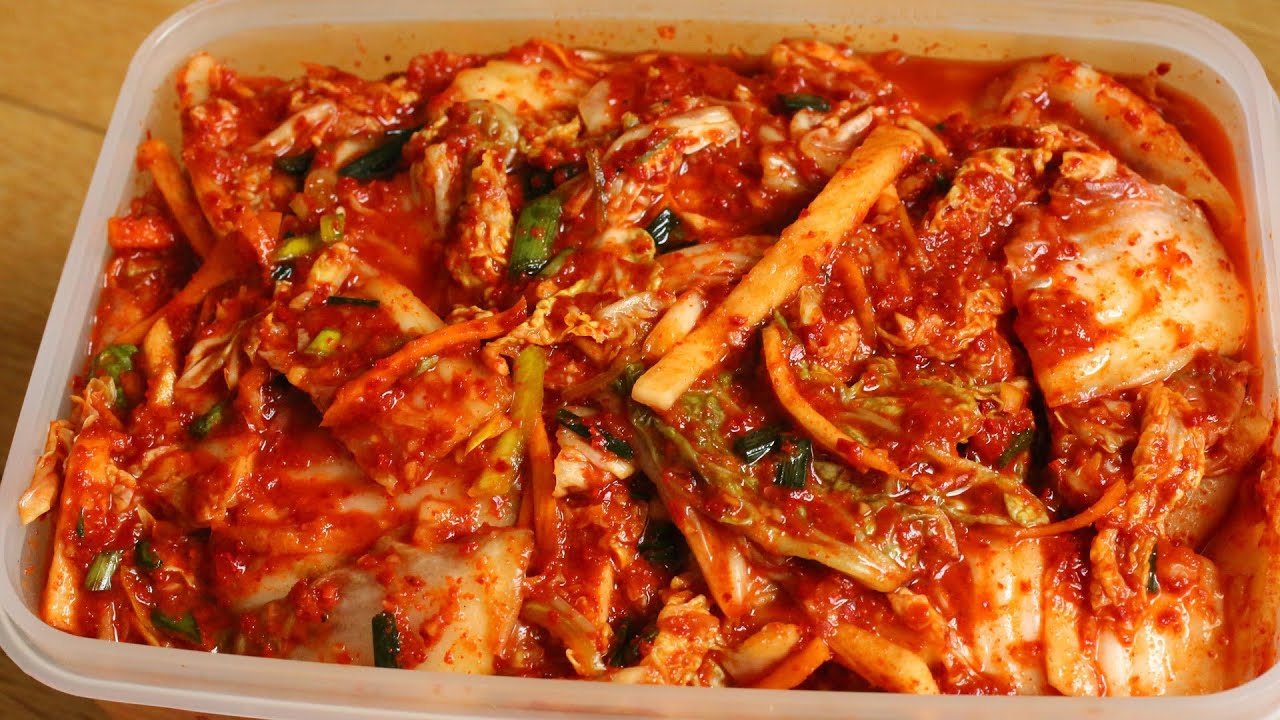
Kimchi, the iconic Korean fermented vegetable dish, has captivated palates worldwide with its bold, tangy, and spicy flavors. Often described as Korea’s national dish, kimchi is more than just a side—it’s a cultural staple that embodies the essence of Korean cuisine. For beginners venturing into homemade ferments, making kimchi might seem intimidating, but it doesn’t have to be. This guide will walk you through an authentic yet straightforward recipe that’s perfect for novices, ensuring you end up with a batch that’s both delicious and true to tradition. Whether you’re looking to add a probiotic boost to your diet or simply explore new flavors, this easy kimchi recipe will have you fermenting like a pro in no time.

The Rich History of Kimchi
Kimchi’s origins trace back over 3,000 years to ancient Korea during the Three Kingdoms period, where it began as a simple method of preserving vegetables through salting and fermentation to survive harsh winters. What started as basic salted radishes evolved over centuries, incorporating chili peppers in the 18th century after they were introduced from the Americas via trade routes. By the Joseon Dynasty (1392–1910), kimchi recipes diversified, with regional variations reflecting local ingredients and preferences. Today, kimchi is a symbol of Korean identity, recognized by UNESCO as an Intangible Cultural Heritage of Humanity in 2013. Its global rise in popularity stems from Korean pop culture, immigration, and growing interest in fermented foods. For more on kimchi’s fascinating evolution, check out this detailed history on Wikipedia.
In modern times, kimchi has transcended its roots to become a health food icon. Korean households consume it daily, and with over 200 varieties, there’s a kimchi for every taste. If you’re new to Korean cooking, this recipe focuses on baechu kimchi (napa cabbage kimchi), the most common type, made accessible for beginners without sacrificing authenticity.
Health Benefits of Kimchi: Why You Should Make It at Home
Beyond its addictive taste, kimchi packs a nutritional punch. As a fermented food, it’s loaded with probiotics—beneficial bacteria that support gut health by improving digestion and boosting the immune system. Regular consumption may reduce inflammation, aid in weight management, and even lower the risk of certain diseases like obesity and type 2 diabetes. Kimchi is rich in vitamins A, B, and C, antioxidants, and fiber, making it a low-calorie superfood that can enhance mental health and slow aging. Studies show that eating kimchi 1-3 times a day could decrease obesity risk, thanks to its anti-inflammatory properties and metabolic benefits.
Making kimchi at home allows you to control the ingredients, avoiding preservatives found in store-bought versions. Plus, the fermentation process naturally preserves the vegetables, creating lactic acid that gives kimchi its signature tang while promoting a healthy microbiome. If you’re interested in more fermented delights, explore our guide to fermented foods on ForknFood.com.
Ingredients for Beginner-Friendly Kimchi
This recipe yields about 1 gallon (4 liters) of kimchi, enough for a small household to enjoy over weeks. We’ve kept it simple, drawing from traditional methods but simplifying for ease. You’ll need basic kitchen tools: a large bowl, gloves (to handle the spicy paste), and airtight jars for storage.
For the Cabbage Brine:
- 1 medium head of napa cabbage (about 2-3 pounds or 1-1.5 kg)
- 1/4 cup (60g) kosher salt or sea salt (non-iodized to avoid inhibiting fermentation)
For the Spice Paste:
- 1/4 cup (30-60g) gochugaru (Korean red chili flakes; adjust for spice level—start low if you’re sensitive)
- 3-5 cloves garlic, minced
- 1-inch piece fresh ginger, grated
- 1 tablespoon sugar (or apple/pear for natural sweetness)
- 2-3 tablespoons fish sauce (or soy sauce for vegan version)
- 1/4 cup water (to form a paste)
Additional Vegetables:
- 1 daikon radish (about 8 oz or 225g), julienned
- 2 carrots, julienned
- 4 green onions, chopped into 1-inch pieces
- Optional: 1 Asian pear, grated for extra sweetness and tenderness
These ingredients are readily available at Asian markets or online. Gochugaru is key for authentic flavor—don’t substitute with other chili powders, as it provides the right heat and color without overwhelming bitterness. For a vegan twist, skip the fish sauce and use miso paste instead.
Step-by-Step Instructions: Making Kimchi Easily
Follow these steps for foolproof results. The process takes about 2-3 hours of active time, plus fermentation.
Step 1: Prepare the Cabbage
Cut the napa cabbage in half lengthwise, then into quarters. Remove the core and chop into bite-sized pieces (about 2 inches) for mak-kimchi, an easy beginner style. This skips the traditional whole-leaf stuffing, saving time while maintaining taste. Place in a large bowl, sprinkle with salt, and massage gently. Cover with water and let brine for 1-2 hours, turning occasionally. The cabbage will wilt and release water, drawing out moisture for better fermentation.
Step 2: Rinse and Drain
After brining, rinse the cabbage under cold water 3 times to remove excess salt. Taste a leaf—it should be salty but not overpowering. Drain well in a colander for 15-30 minutes. This step prevents overly salty kimchi.
Step 3: Make the Spice Paste
In a blender or food processor, combine garlic, ginger, sugar, fish sauce, gochugaru, and water. Blend into a smooth paste. If it’s too thick, add a splash more water. For extra umami, incorporate grated pear here. Wear gloves to avoid chili burns!
Step 4: Mix Everything Together
In a large bowl, combine the drained cabbage, julienned radish, carrots, and green onions. Pour in the spice paste and mix thoroughly, ensuring every piece is coated. Massage with your hands (gloved) for 5 minutes—this helps the flavors penetrate and starts the fermentation.
Step 5: Pack and Ferment
Transfer the mixture to clean glass jars, pressing down firmly to remove air bubbles and submerge in its own brine. Leave 1-2 inches of headspace for expansion. Seal loosely and let ferment at room temperature (around 70°F/21°C) for 1-5 days. Taste daily after day 1; bubbles and a tangy smell indicate fermentation. Once it reaches your desired sourness, refrigerate to slow the process. Kimchi can last months in the fridge, deepening in flavor over time.
Tips for Beginners: Avoiding Common Pitfalls
- Hygiene is Key: Use clean utensils to prevent bad bacteria. Fermentation relies on good lactobacillus.
- Spice Level: Start with less gochugaru and build up. Authentic kimchi is spicy, but customize it.
- Fermentation Time: Cooler rooms take longer; warmer ones speed it up. Burp jars daily to release gas.
- Storage: Refrigerate after fermenting. If mold appears (rare if done right), discard the batch.
- Troubleshooting: Too salty? Rinse more next time. Not fermenting? Ensure room temp isn’t too cold.
For more beginner tips on fermentation, visit our https://forknfood.com/ fermentation basics article.
Variations: Customizing Your Kimchi
Once comfortable, experiment! Traditional tongbaechu-kimchi uses whole leaves, stuffed and fermented intact for a more elegant presentation. Try white kimchi (baek-kimchi) without chili for a milder version, or add seafood like oysters for kkakdugi (radish kimchi). Vegan options swap fish sauce for soy or seaweed. Seasonal twists include cucumber kimchi in summer or pumpkin in fall. For inspiration, check Maangchi’s variations.
Serving Suggestions: Incorporating Kimchi into Meals
Kimchi shines as a banchan (side dish) with rice, but its versatility extends far. Add it to fried rice, stews like kimchi-jjigae, or tacos for fusion flair. Top ramen, burgers, or eggs for a spicy kick. Pair with grilled meats or in salads. For Korean meal ideas, explore our Korean recipes section.
Frequently Asked Questions
How long does homemade kimchi last? Up to 3-6 months in the fridge, but it’s best within the first month.
Is kimchi vegan? Traditional recipes use fish sauce, but substitute with soy sauce for a vegan version.
Can I make kimchi without gochugaru? Not authentically—it’s essential for flavor. Substitutes like cayenne alter the taste.
Why is my kimchi not spicy enough? Add more gochugaru next time, or let it ferment longer for intensified flavors.
Is kimchi good for weight loss? Yes, its low calories and probiotics may aid metabolism and reduce obesity risk.
Conclusion: Start Your Kimchi Journey Today
Making kimchi at home is a rewarding adventure that connects you to centuries-old traditions while delivering fresh, probiotic-rich goodness. This beginner recipe proves it’s authentic and easy—no fancy equipment needed. With practice, you’ll tweak it to perfection, perhaps even sharing batches with friends. Dive into the world of ferments and elevate your meals. For more recipes, visit ForknFood.com’s Asian cuisine hub. Happy fermenting!
Kimchi Recipe for Beginners: Authentic & Easy to Make.

Frequently Asked Questions
Here are some of the most common questions beginners ask about making kimchi at home, based on real experiences from home fermenters.
What can I substitute for gochugaru if I can’t find it?
Gochugaru is essential for authentic flavor and color—it’s milder and smokier than regular chili flakes. Avoid substitutes like cayenne or paprika, as they can make the kimchi too hot or bitter. If unavailable, order online from reliable sources. For the best results, stick with Korean brands.
Can I make vegan kimchi?
Yes! Traditional recipes use fish sauce or salted shrimp (saeujeot) for umami, but replace them with soy sauce, tamari, or miso paste. Some add kelp powder or dried shiitake for depth. The fermentation works the same, and it tastes fantastic.
How long does kimchi take to ferment?
It depends on room temperature. At 65–75°F (18–24°C), it starts developing tang in 1–3 days. Taste daily—bubbles and sourness indicate progress. Move to the fridge when it reaches your preferred flavor (usually 3–7 days). Warmer rooms speed it up; cooler ones slow it down.
Why isn’t my kimchi fermenting or it’s too salty?
No bubbles? Check temperature—too cold stalls fermentation. Too salty? Rinse the cabbage more thoroughly next time or use less salt. Always use non-iodized salt. If it smells off (rotten instead of tangy), discard and start fresh with clean tools.
How do I store homemade kimchi, and how long does it last?
Refrigerate in airtight jars once fermented. It continues to slowly ferment and deepens in flavor for months—many say it’s best after 2–4 weeks. It can last 3–6 months or longer in the fridge. Burp the jar occasionally to release gas.
Is it safe to make kimchi at home?
Yes, when following hygiene practices. Use clean equipment, submerge ingredients in brine, and refrigerate after primary fermentation. Bad bacteria are rare if you avoid contamination. The lactic acid from fermentation preserves it naturally.
What if my kimchi has white film or mold?
A white film (kahm yeast) on top is often harmless—scrape it off if it appears. Fuzzy mold means discard the batch. Prevent by pressing down to keep everything submerged.
For more troubleshooting, check out expert resources like Maangchi’s Easy Kimchi guide.
Recommended Products and Tools for Making Kimchi
To make your kimchi experience smoother, especially as a beginner, invest in a few key items. These help with authenticity, ease, and consistent results.
Essential Ingredients to Buy
- Gochugaru (Korean Red Chili Flakes): The star of the show—choose coarse grind for kimchi. Popular authentic brands include Taekyung (widely recommended for its clean, bright flavor) and others like Choripdong or East & Else. Look for sun-dried, non-GMO options without additives. Available in 1 lb bags for bulk making.
- Napa Cabbage and Other Veggies: Fresh from local Asian markets or grocery stores. Opt for organic if possible.
- Fish Sauce or Vegan Alternatives: Korean brands for authenticity, or soy sauce/miso for vegan.
Useful Tools and Equipment
- Fermentation Jars or Crocks: Glass mason jars work great for beginners—wide-mouth for easy packing. For traditional feel, try ceramic fermentation crocks with water-seal lids (prevents mold by allowing gas escape while blocking air). These often include weights to keep veggies submerged.
- Disposable Gloves: Essential for mixing the spicy paste without burning your hands.
- Other Basics: Large mixing bowl, cutting board, knife, food processor (for paste), and tamper (to pack down the kimchi).
Starter kits like Mama O’s Premium Homemade Kimchi Kit bundle paste, jar, airlock, gloves, and instructions—perfect for first-timers.
Shop these on sites like Amazon, Asian grocery stores, or specialty fermentation shops. For more on Korean pantry staples, visit our Korean pantry essentials guide on ForknFood.com.
Recommended Products and Tools for Making Kimchi (Continued)
Building on the essentials like gochugaru, napa cabbage, and basic jars, here are more related products that can elevate your homemade kimchi game. These include specialized fermentation vessels, complete kits for beginners, high-quality ingredients, and handy accessories. Many are available on sites like Amazon, H Mart, or specialty fermentation shops.
Fermentation Crocks and Specialized Containers
For larger batches or a more traditional feel, upgrade from regular glass jars to dedicated fermentation crocks. These often feature water-seal lids (a moat filled with water) to create an airtight environment, reduce mold risk, and allow gases to escape naturally—ideal for kimchi’s active fermentation.
- Ceramic Water-Seal Fermentation Crocks (e.g., 1-5 gallon sizes from brands like Ohio Stoneware, Stone Creek Trading, or generic on Amazon): These are popular for sauerkraut, pickles, and especially kimchi. They come with glazed weights to keep ingredients submerged. A 1-3 gallon size suits most home makers—perfect for 5-10 lbs of cabbage. Look for food-safe, lead-free options with deep water channels for minimal maintenance.
- E-Jen or Onggi-Style Pots: Traditional Korean earthenware (onggi) pots allow slight “breathing” for authentic flavor. Modern versions are glazed and easier to clean. Great for pogi kimchi (whole cabbage style).
- Masontops or Similar Airlock Lids for Mason Jars: If you prefer jars, these screw-on lids with airlocks make burping unnecessary and prevent explosions from built-up gas.
These tools help achieve consistent, professional results, especially for bigger batches that last months.
Complete Kimchi Making Kits
Kits bundle everything for hassle-free starts—perfect if you’re new or want convenience.
- Mama O’s Premium Homemade Kimchi Kit: Includes a fermentation jar, airlock lid, pre-made kimchi paste (original, super spicy, or vegan options), gloves, and instructions. Highly praised for ease and repeatable perfect batches—around $55.
- Pop Cultures Kimchi Making Kit: Comes with a 1-gallon jar, airlock lid, weight, and recipe. Focuses on fresh, flavorful results with minimal effort.
- Revolution Fermentation Complete Kimchi Kit: Beginner-friendly with illustrated recipes, chili flakes, salt, Le Parfait-style jars, and weights. Reusable and ready-to-go.
Kits save time on sourcing paste and ensure balanced flavors right away.
Other Helpful Accessories and Ingredients
- Fermentation Weights and Pickle Pebbles: Glass disks or ceramic weights to submerge veggies fully—prevents floating and mold. Affordable and reusable.
- Disposable Nitrile Gloves: A must for mixing spicy paste without skin irritation. Get food-grade, powder-free packs.
- Digital Kitchen Scale: For precise salt measurements (key to successful brining and avoiding overly salty or under-fermented kimchi).
- High-Quality Fish Sauce Alternatives: For umami—Red Boat (Vietnamese, clean flavor) or Korean brands. Vegan options: soy sauce, tamari, or miso.
- Kimchi-Specific Containers for Storage: After fermentation, transfer to airtight plastic or glass kimchi containers (often rectangular for fridge stacking) or dedicated “kimchi fridges” if you’re serious about long-term storage at optimal temps.
Where to Shop
Check local Asian markets (like H Mart in many cities) for authentic gochugaru and veggies. Online: Amazon for kits and crocks, or specialty sites like kimchirules.com (Mama O’s) or stonecreektrading.com for crocks. For more Korean pantry must-haves, see our Korean pantry essentials guide on ForknFood.com.

These additions make the process more enjoyable and reliable. Start simple with jars, then invest in a crock or kit as you get hooked on homemade kimchi. Your gut (and taste buds) will thank you!


Leave a Reply