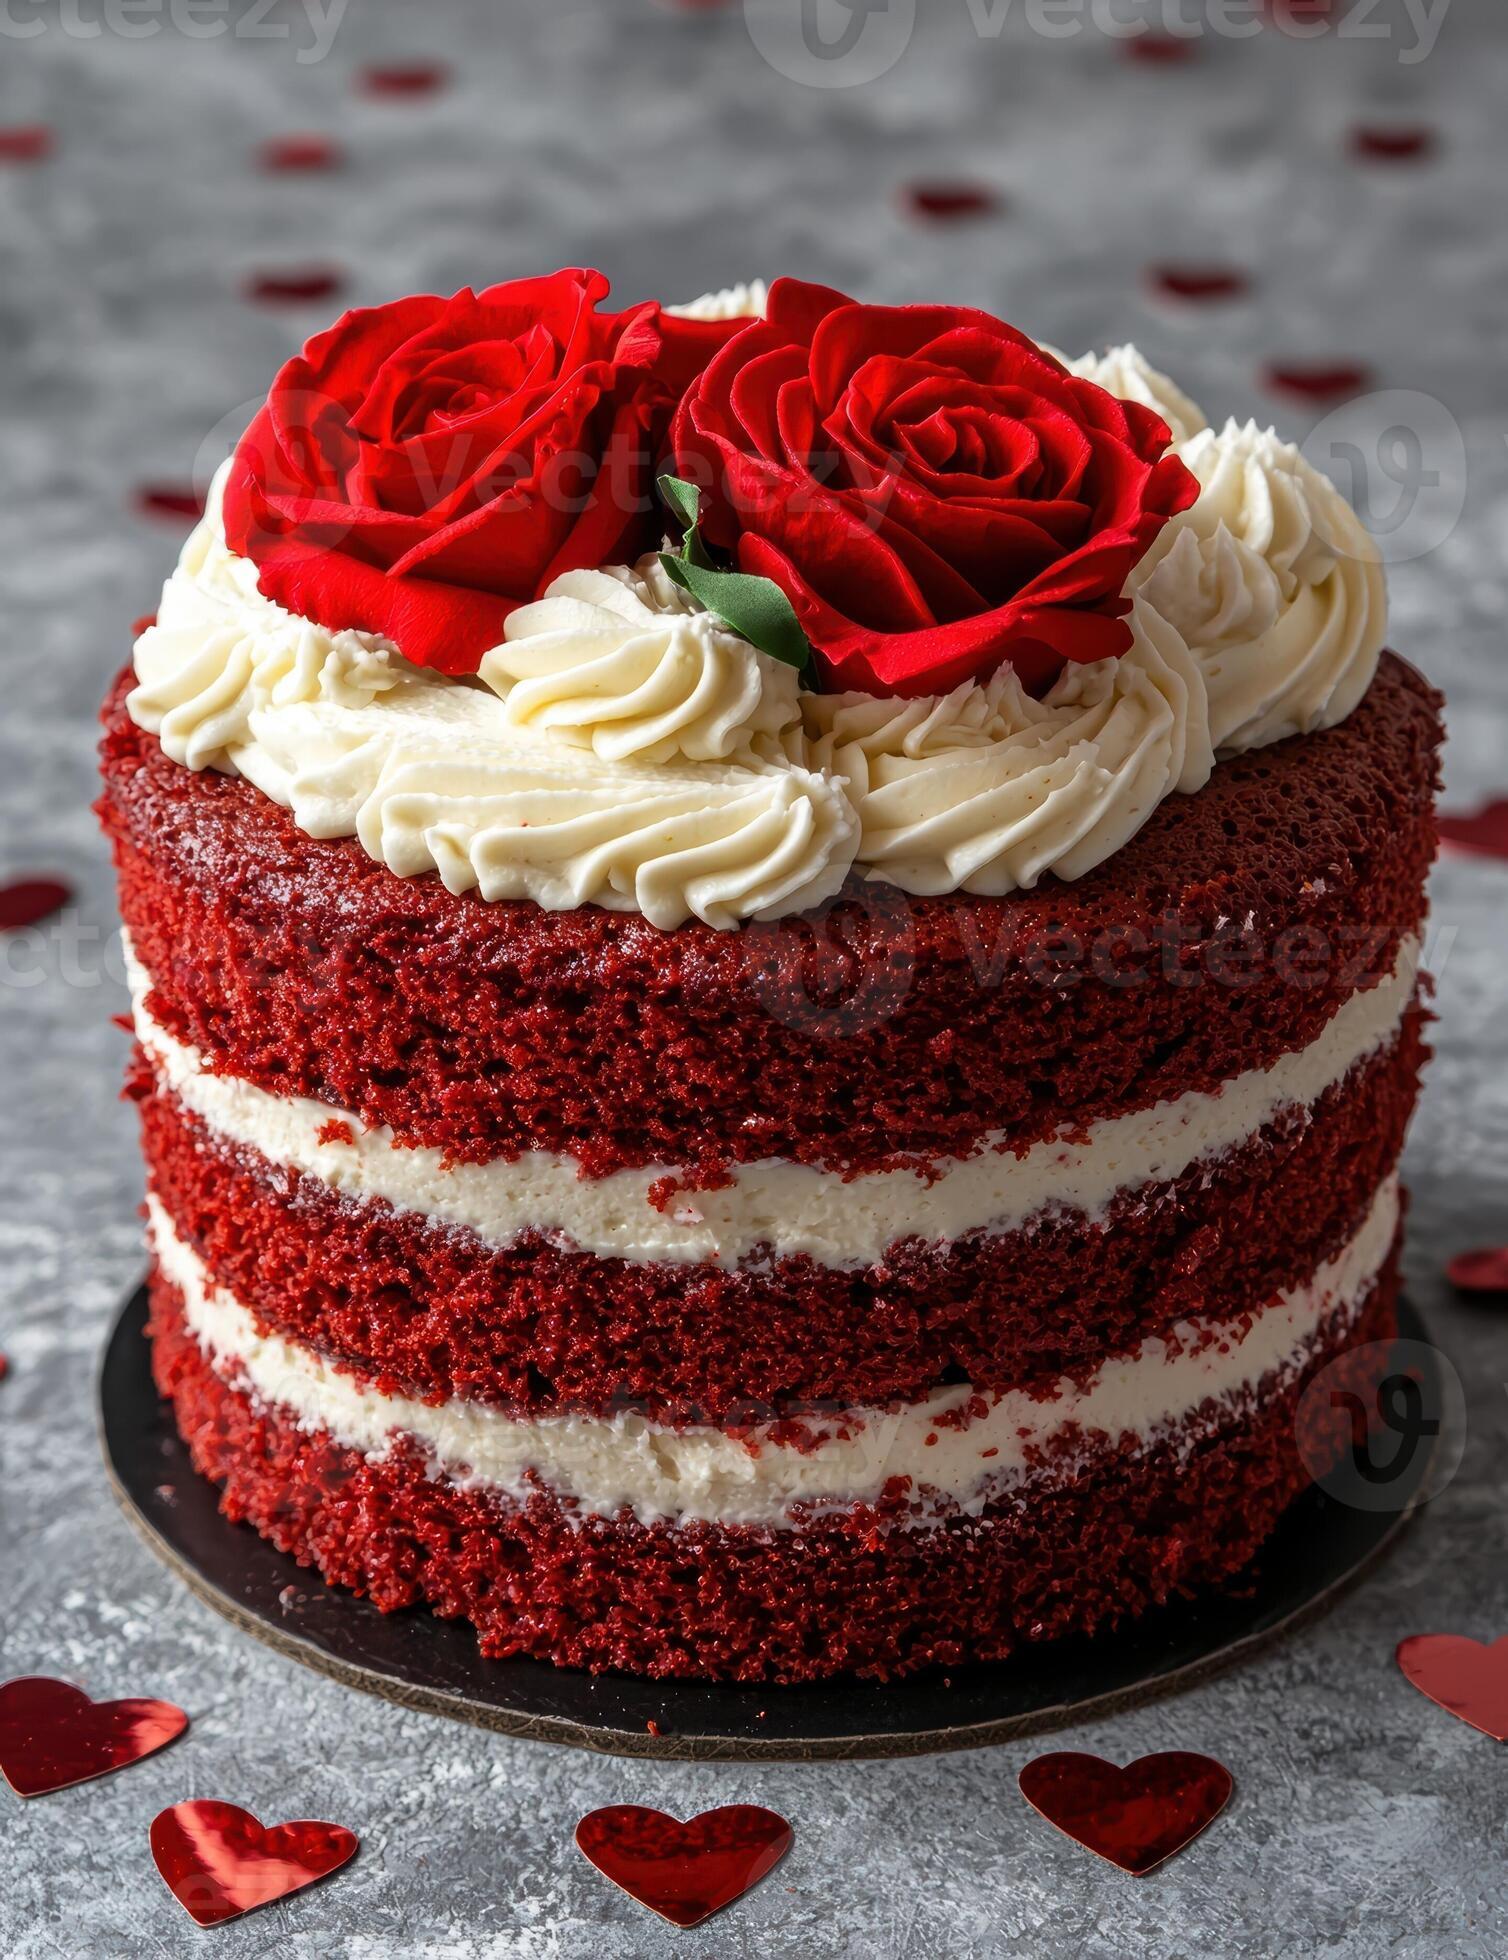
Few desserts evoke as much passion and nostalgia as the red velvet cake. With its striking crimson hue, velvety crumb, and tangy cream cheese frosting, this cake has become a staple at celebrations, from birthdays to weddings and Valentine’s Day gatherings. But what makes it truly decadent? It’s the perfect balance of subtle cocoa flavor, moist texture, and that irresistible frosting that melts in your mouth. In this comprehensive guide, we’ll dive deep into the world of red velvet cake, exploring its rich history, the science behind its unique characteristics, a foolproof recipe tailored for home bakers, tips for perfection, creative variations, and even some pairing ideas to elevate your dessert experience. Whether you’re a novice in the kitchen or a seasoned pro, this article will equip you with everything you need to create a showstopper for your next gathering.
At ForknFood.com, we believe in celebrating timeless recipes that bring joy to the table. If you’re new to baking layered cakes, check out our https://forknfood.com/ Baking Basics Guide for essential tips on tools and techniques. Now, let’s uncover the story behind this beloved treat.

The Fascinating History of Red Velvet Cake
The origins of red velvet cake are shrouded in a bit of mystery, much like the cake’s enigmatic red color itself. While it’s often associated with the American South, where it remains a cultural icon, its roots trace back further. The concept of “velvet” cakes emerged during the Victorian era in the 19th century. Back then, bakers sought to create cakes with an exceptionally fine, soft texture—described as “velvety”—by incorporating ingredients like cocoa powder, almond flour, or cornstarch to break down the coarse proteins in flour. These velvet cakes weren’t necessarily red; the name referred to their luxurious mouthfeel, a nod to the opulent fabrics of the time.
The evolution into the red velvet we know today began in the early 20th century. Around 1911, recipes for “velvet cocoa cakes” started appearing, blending the soft texture of velvet cakes with the deep flavor of devil’s food cake, but using cocoa powder instead of melted chocolate for a lighter result. The signature red tint wasn’t always from food coloring. Originally, it came from a natural chemical reaction: the anthocyanins in non-Dutch-processed cocoa powder (which is more acidic) reacted with acidic ingredients like buttermilk and vinegar, producing a reddish-brown hue. This subtle red was enhanced during World War II when food rationing led bakers to use beet juice for both moisture and a vibrant color boost.
The cake gained national fame in the 1920s when it became a signature dessert at New York City’s iconic Waldorf-Astoria Hotel. Legend has it that a guest requested the recipe, only to be billed $100 (a hefty sum back then), leading to its nickname “the $100 cake.” Whether true or not, this story helped popularize it. By the mid-20th century, with the advent of Dutch-processed cocoa (which is alkalized and less reactive), bakers turned to red food coloring to achieve that bold scarlet shade. The 1943 edition of “The Joy of Cooking” featured an early version, though author Irma Rombauer reportedly wasn’t a fan.
In the South, red velvet became synonymous with hospitality and special occasions. Its rise in popularity was also boosted by companies like Adams Extract, which promoted red food coloring through recipe cards in the 1940s. Today, it’s a global favorite, appearing in cupcakes, cheesecakes, and even ice cream. For more on Southern desserts, explore our Southern Sweets Collection on ForknFood.com. If you’re curious about the science of food coloring in baking, check out this external resource from the FDA.
This history underscores why red velvet isn’t just chocolate cake in disguise—it’s a unique blend of flavors and textures that has stood the test of time. Now, let’s get to the heart of the matter: how to make your own decadent version.
Ingredients for the Perfect Red Velvet Cake
Crafting a decadent red velvet cake starts with quality ingredients. This recipe serves 12 and yields a two-layer 9-inch cake, but you can easily scale it for cupcakes or a sheet cake. We’ll use a combination of oil and butter for moisture, cake flour for tenderness, and plenty of buttermilk for that signature tang.
For the Cake:
- 2 ½ cups (300g) cake flour (or all-purpose flour sifted with ¼ cup cornstarch for a similar effect)
- 2 tablespoons unsweetened natural cocoa powder (not Dutch-processed for the best color reaction)
- 1 teaspoon baking soda
- ½ teaspoon baking powder
- 1 teaspoon salt
- 1 ½ cups (300g) granulated sugar
- ½ cup (115g) unsalted butter, softened
- ½ cup (120ml) vegetable oil (for extra moistness)
- 2 large eggs, at room temperature
- 2 large egg yolks (for richness)
- 1 cup (240ml) buttermilk, at room temperature
- 2 teaspoons pure vanilla extract
- 1 teaspoon white distilled vinegar (enhances the red color and tenderness)
- 1-2 ounces red food coloring (liquid or gel; adjust for desired vibrancy)
- Optional: ½ cup hot coffee (for deeper cocoa flavor without overpowering)
For the Cream Cheese Frosting:
- 16 ounces (450g) full-fat cream cheese, softened
- ½ cup (115g) unsalted butter, softened
- 4-5 cups (480-600g) powdered sugar (sifted to avoid lumps)
- 2 teaspoons pure vanilla extract
- Pinch of salt (to balance sweetness)
These measurements are inspired by trusted sources like Sally’s Baking Addiction and Preppy Kitchen, ensuring a moist, flavorful result. For substitutions, like using gluten-free flour, see our Ingredient Swaps Guide. Externally, King Arthur Baking offers great tips on flour types.
Step-by-Step Instructions: Baking the Cake
Preheat your oven to 350°F (175°C). Grease and flour two 9-inch round cake pans, or line them with parchment paper for easy release. This prevents sticking and ensures even baking.
In a medium bowl, sift together the cake flour, cocoa powder, baking soda, baking powder, and salt. Sifting aerates the dry ingredients, contributing to that velvety texture. Set aside.
In a large mixing bowl or stand mixer fitted with the paddle attachment, cream the softened butter and sugar on medium speed until light and fluffy—about 3-4 minutes. This incorporates air for a tender crumb. Gradually add the oil, mixing until combined. The oil keeps the cake moist even after refrigeration.
Beat in the eggs and egg yolks one at a time, ensuring each is fully incorporated before adding the next. This emulsifies the batter, preventing curdling. Stir in the vanilla extract.
In a separate bowl or measuring cup, mix the buttermilk, vinegar, and red food coloring. The vinegar reacts with the baking soda later for lift, while the buttermilk adds tang and tenderness.
With the mixer on low speed, alternate adding the dry ingredients and the buttermilk mixture to the butter mixture. Start and end with the dry ingredients: add one-third dry, half wet, one-third dry, remaining wet, and final dry. Mix just until combined—overmixing leads to a tough cake. If using, gently fold in the hot coffee at the end for enhanced cocoa depth without thinning the batter too much.
Divide the batter evenly between the prepared pans. Tap the pans on the counter to release air bubbles. Bake for 25-30 minutes, or until a toothpick inserted in the center comes out clean or with a few moist crumbs. Rotate the pans halfway through for even baking.
Cool the cakes in the pans for 10 minutes, then invert onto wire racks to cool completely. This prevents sogginess. Level the tops with a serrated knife if domed, and save the scraps for decorating (crumble them for a “velvet crumb” topping).
While the cakes cool, prepare the frosting.
Mastering the Cream Cheese Frosting
Cream cheese frosting is the crowning glory of red velvet cake—tangy, creamy, and not overly sweet. In a large bowl, beat the softened cream cheese and butter on medium speed until smooth and lump-free, about 2 minutes.
Gradually add the powdered sugar, one cup at a time, mixing on low to avoid a sugar cloud. Once incorporated, increase to medium and beat until fluffy. Stir in the vanilla and salt. If too thick, add a splash of milk; if too thin, more sugar.
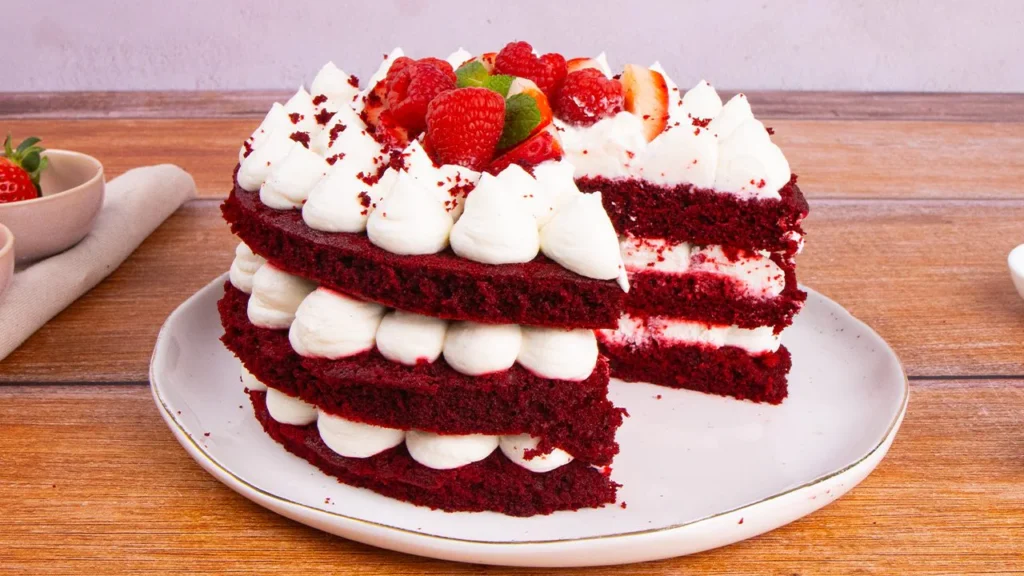
For assembly: Place one cake layer on a serving plate or cake stand. Spread about 1 cup of frosting evenly over the top. Add the second layer, then frost the top and sides. For a naked or semi-naked look, use less frosting on the sides to let the red peek through. Decorate with cake crumbs or fresh berries.
Chill the cake for 30 minutes to set the frosting before slicing. This recipe yields a stable frosting that pipes beautifully if you want swirls. For more frosting ideas, visit our Frosting Fundamentals.
Tips for Baking Success and Common Pitfalls
Achieving decadence requires attention to detail. Use room-temperature ingredients for better emulsion—cold eggs can cause curdling. Measure flour correctly by spooning and leveling to avoid a dense cake.
For the reddest color, use gel food coloring; it’s more concentrated and doesn’t alter the batter’s consistency. If natural alternatives appeal, try beet powder, though it may mute the vibrancy.
Bake in the center of the oven and avoid opening the door too soon to prevent sinking. Test doneness early; overbaking dries out the cake.
Storage: Refrigerate in an airtight container for up to 5 days, or freeze unfrosted layers for 3 months. Bring to room temperature before serving for optimal texture.
Common mistakes? Too much cocoa makes it taste like chocolate cake—stick to 2 tablespoons for subtlety. If your frosting is runny, chill it briefly.
For advanced bakers, try the reverse creaming method: mix dry ingredients with fat first for an even finer crumb. Explore Serious Eats for baking science deep dives.
Creative Variations and Modern Twists
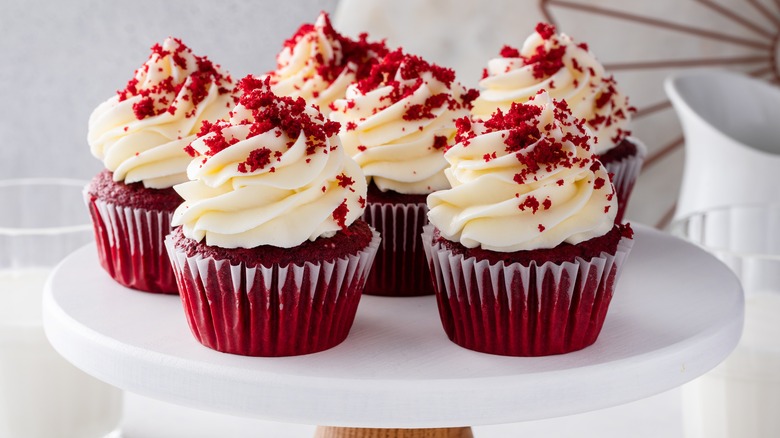
Red velvet’s versatility shines in variations. For cupcakes, divide the batter into 24 liners and bake for 18-20 minutes. Top with frosting rosettes.
Add-ins: Fold in white chocolate chips or chopped pecans for texture. For a Southern twist, incorporate bourbon into the batter or frosting.
Dietary adaptations: Use gluten-free flour blends, or make it vegan with plant-based buttermilk (milk + vinegar) and egg substitutes. For low-sugar, swap some sugar with erythritol.
Themed versions: Red velvet whoopie pies, truffles from leftovers, or a cheesecake-layered cake for ultimate decadence. Check our Cake Variations Hub for inspiration, or this external recipe collection from BBC Good Food.
Pairings and Serving Suggestions
Pair red velvet with coffee or milk to cut the richness. For events, serve with fresh raspberries or a raspberry coulis for tart contrast.
Wine lovers: A light Pinot Noir or sparkling rosé complements the cocoa notes. Nutritionally, it’s indulgent—about 450 calories per slice—but portion control or lighter frosting helps.
Conclusion: A Timeless Treat
Decadent red velvet cake with cream cheese frosting is more than dessert; it’s a celebration of flavor, history, and creativity. With this guide, you’re ready to bake your masterpiece. Share your creations on ForknFood.com’s Community Forum. Happy baking!
Frequently Asked Questions (FAQs)
Here are answers to the most common questions home bakers have about red velvet cake. These draw from real baking experiences and trusted sources.
1. What does red velvet cake actually taste like?
Red velvet isn’t just chocolate cake dyed red—it’s a subtle blend of mild cocoa, tangy buttermilk, and vanilla with a light, velvety crumb. The tang from buttermilk and vinegar balances the sweetness, making it unique and not overly chocolatey. Many describe it as “buttery vanilla with a hint of cocoa.”
2. Is red velvet cake basically a chocolate cake?
No! While it contains cocoa powder (usually just 1-2 tablespoons), the flavor is far more vanilla-forward and tangy than a true chocolate cake. Overusing cocoa turns it brownish and masks the signature “velvet” taste. Stick to natural (non-Dutch-processed) cocoa for the best color reaction.
3. Why is vinegar (or lemon juice) used in red velvet cake?
Vinegar reacts with baking soda to create lift and tenderness, while enhancing the bright red color through its acidity (especially with natural cocoa’s anthocyanins). It also adds subtle tang without tasting “vinegary.”
4. Can I skip the red food coloring?
Yes, but the cake will be a reddish-brown or cocoa color instead of vibrant scarlet. For a natural alternative, try beet powder, though it may alter flavor slightly and yield a muted hue.
5. What’s the best red food coloring for red velvet cake?
Gel food coloring is superior to liquid—it provides intense color without thinning the batter. Popular choices include AmeriColor Super Red or a mix of Super Red and Crimson for a rich, true red. Avoid oil-based or overly bitter powders that can leave a chemical aftertaste.
6. Why did my red velvet cake turn brown or uneven in color?
Common culprits: too much cocoa (turns it chocolatey-brown), overbaking (dries it out and darkens edges), or high oven heat causing discoloration. Always check doneness early with a toothpick (a few moist crumbs = done) and use gel coloring for even vibrancy.
7. How do I store red velvet cake with cream cheese frosting?
Refrigerate in an airtight container for up to 5 days due to the cream cheese. For longer storage, freeze unfrosted layers (wrapped tightly) for up to 3 months. Thaw in the fridge and frost fresh. Bring slices to room temperature before serving for the best texture and flavor.
8. Can I make this cake ahead of time?
Absolutely! Bake and cool the layers up to 2 days in advance (store wrapped at room temp or freeze). Frost the day of or the day before serving. The flavors often deepen overnight.
9. Why is my cake dense or tough?
Overmixing after adding flour develops gluten, leading to toughness. Overbaking dries it out, and inaccurate flour measurement (scooping vs. spoon-and-level) adds too much. Use room-temperature ingredients and mix just until combined.
10. Is cream cheese frosting the only option?
It’s the classic pairing—tangy and creamy to complement the cake’s subtle flavors—but you could try a lighter whipped cream cheese version or buttercream if preferred. Traditionalists swear by cream cheese!
For more troubleshooting, see our Baking Troubleshooting Guide on ForknFood.com.
Recommended Products & Tools for Red Velvet Cake
Elevate your baking game with these essentials. These recommendations focus on quality items that make a noticeable difference in texture, color, and ease.
Key Ingredients to Stock Up On:
- Cake Flour: For that signature tender crumb—try King Arthur Unbleached Cake Flour.
- Natural Unsweetened Cocoa Powder: Hershey’s or Valrhona for reliable flavor and color reaction.
- Gel Food Coloring: AmeriColor Super Red (highly concentrated, no weird taste)—a baker favorite.
- Buttermilk: Full-fat for tang and moisture (or make your own: milk + 1 Tbsp vinegar/lemon juice per cup).
- Full-Fat Cream Cheese: Philadelphia brand for smooth, stable frosting.
Must-Have Tools:
- 9-Inch Round Cake Pans: Anodized aluminum for even baking—check Wilton or USA Pan sets.
- Parchment Paper Rounds: Pre-cut for easy release and no sticking.
- Offset Spatula: For smooth frosting application—essential for that professional finish.
- Cake Turntable: Makes frosting and decorating effortless.
- Digital Kitchen Scale: Precise measurements prevent dense cakes—Ozeri or Escali are reliable.
- Stand Mixer or Hand Mixer: For creaming butter and sugar to fluffy perfection.
For a complete shopping list and more gear recommendations, visit our Essential Baking Tools Guide. Externally, explore King Arthur Baking’s shop for premium ingredients or Amazon for AmeriColor gel to get started.
I’ve kept recommendations practical, with a mix of must-haves and upgrades. Many are globally available (including in Pakistan via online platforms like Daraz.pk or international shipping), and I’ve included external links for easy reference (great for affiliate opportunities if your site uses them).
Recommended Products & Tools for Red Velvet Cake (Expanded Edition)
Elevate your baking with these top-rated essentials. From ingredients that guarantee vibrant color and moisture to tools for professional results, these are baker favorites in 2025–2026.
Top Ingredients for Scratch Baking:
- Cake Flour — King Arthur Unbleached Cake Flour remains the gold standard for a tender, velvety crumb. (Alternative: Use all-purpose flour with a bit of cornstarch if unavailable locally.)
- Natural Unsweetened Cocoa Powder — Hershey’s or Valrhona for reliable flavor and the best natural red reaction with acidic ingredients.
- Gel Food Coloring — AmeriColor Super Red (or a Super Red + Crimson mix) is the most recommended for intense, fade-resistant scarlet without altering batter consistency or adding off-flavors. Gel beats liquid every time—bakers swear by it for that “tomato red” hue.
- Buttermilk — Full-fat cultured versions (like local dairy brands or imported) for authentic tang. Quick substitute: Whole milk + 1 Tbsp vinegar/lemon juice per cup.
- Full-Fat Cream Cheese — Philadelphia brick-style is the top pick for smooth, stable frosting that holds up on layers without weeping. Avoid tub or low-fat varieties—they make runny frosting.
- Pure Vanilla Extract — High-quality options like Nielsen-Massey for deeper flavor that shines through the cocoa.
Convenient Shortcuts: Top Red Velvet Cake Mixes (When You Want Bakery Results Fast):
For busy days or beginners, these boxed mixes deliver moist, flavorful cakes with minimal effort. Recent taste tests rank them highly:
- Betty Crocker Delights Super Moist Red Velvet — Often crowned the best for balanced moisture, fluffy texture, and true red velvet taste without artificial aftertaste.
- Pillsbury Red Velvet — Nostalgic favorite with great rise and tang—perfect for cupcakes or quick layers.
- Duncan Hines Signature Red Velvet — Rich cocoa notes and perfect moisture, though some find it slightly sweeter.
Pair any with homemade cream cheese frosting for that from-scratch feel.
Must-Have Tools & Decorating Upgrades:
- 9-Inch Round Cake Pans — Fat Daddio’s anodized aluminum for even baking and easy release—no sticking issues.
- Parchment Paper Rounds — Pre-cut circles (available on Amazon or baking stores) for foolproof pan lining.
- Offset & Straight Icing Spatulas — Ateco set (small offset for details, large straight for smoothing sides) for that sleek, professional finish on red velvet’s classic naked or crumb-coated look.
- Cake Turntable — Rotating stand (like Innovative Sugarworks or budget options) makes frosting effortless—essential for even cream cheese swirls.
- Cake Scraper / Bench Scraper — For ultra-smooth sides; metal ones give sharp edges.
- Digital Kitchen Scale — Precise weighing prevents dense cakes—Ozeri or Escali models are reliable and affordable.
- Piping Bags & Tips — For decorative swirls or borders on the frosting—Wilton kits work well for beginners.
For a complete shopping list, check our Essential Baking Tools Guide on ForknFood.com. Externally, browse King Arthur Baking’s shop for premium flours and cocoa, Amazon for AmeriColor Super Red gel (highly concentrated and pro-approved), or Sally’s Baking Addiction tool recommendations for more inspiration.
These products help you achieve bakery-level decadence every time—whether going fully homemade or with smart shortcuts. Share your favorite finds in the comments below!


Leave a Reply